Type 3

Background:
Finally, there is a third type, known as the Glastonbury Chair. While it's described as a folding chair, most versions that I have seen do not fold. It's basically an X frame chair sat crosswise (between the Xs instead of over them) with a rigid seat and back.
This is a very common form in the SCA owing to its ability to pack completely flat since it's disassembled instead of folded. And, while it's more complex than it would seem, it's mostly straight boards and simple joinery that's well within the reach hobbyist level woodworkers.
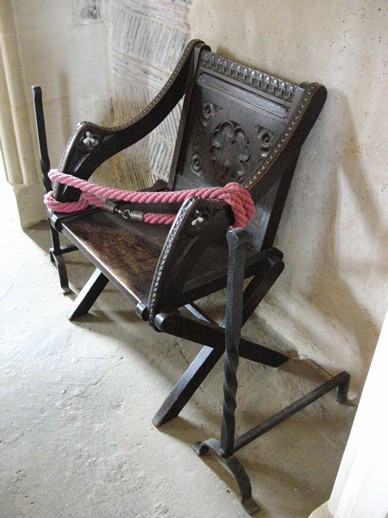
Commonly called a Glastonbury Chair due to the origin of the surviving example that is believed to have originated in the Glastonbury Abbey, England. That abbey was dissolved in 1539 (thanks to Henry VIII) and it now resides in Bishops Palace, Wells. It is believed to have been made around 1535 and represents the earliest known example of this form in England (Gabriel Olive, Regional Furniture, 1994).
To continental Europeans, this is often called a Petrarca Chair owning to what is believed to be a well preserved original at Petrarch’s House in Arquà Petrarca, near Padua. The final residence of the Italian poet Fransesco Petrarca (d. 1374) making this a late 14th-century form (in Italy).
Despite appearances and descriptions, neither of these chairs can be folded. It is believed that they were made for travel, but that they were disassembled. There are many later variations that do fold, but they are more accurately gothic echoes of these late medieval chairs.
I have made a couple of Glastonbury Chairs using the measurements from Daniel Diehl's Constructing Medieval Furniture (ISBN 978-0811727952; 1996) so I have a lot to say on that experience (see Construction Notes).
Seating:
Seating is across the X.

Practical Matters:
Almost any variation of this chair ends up being quite sturdy. Though they can be deceptively complex to construct, at least ones faithful to the "plans" published by Diehl. Mine can be safely sat even without the pins. It ends up being a bunch of parts, because despite descriptions, it does not fold, it disassembles. So it packs quite flat.
The assembly process can be quite a pain especially with tight joinery like mine. The squires and children mockingly call them puzzle chairs. I have carefully marked all the pieces for my 3 chairs to ease assembly, but even so you can be left banging on them and scratching your head. They may look identical, but they are hand made and the parts are not interchangeable.
After 10 years with them, I rarely take them anywhere except Pennsic now. Day events just don't feel like they are worth the effort of assembly (or listening to the kids bitch).
That said, even basically 5 months outside (10 Pennsics x 2 weeks) that are rock solid and I can easily imagine them lasting hundreds of years if indoors.
Construction Notes:
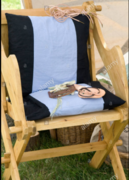
Master Reynard and I made several of these chairs some years ago. Tto the right is an image of one of my chairs nearing completion.
First, the plans in the book are not sufficient for an inexperienced woodworker to construct this chair. I am not inexperienced, and it still took me a lot of "figguring" and advice from Master Reynard to turn these plans into an actual chair.
They are not the construction drawings you'd get from, say, a woodworking magazine. They are measured drawings of an extant chair.
One major difference is in the joinery details. A construction plan calls out the joinery rather specifically as this is the make or break area for any project. This article in Diehl’s book had no details other than the obvious ones with the pinned parts.
When the book came out, there was some speculation around the SCA as to whether anyone in the writing process actually tried to use the plans to build some of the pieces in the book. Based on some of the struggles we went through in following these plans, I would say this one was not built. If it was, then the editing process let the authors down.
One of the issues was that a piece was omitted from the detail drawings and the cut list: the front seat frame board. This one is pretty important as it houses the front peg for attaching the arms and legs.
As noted above, there were no details about the back or seat frame joinery. Given the typical methods in use at the time, I would expect the back to be a panel and frame unit with the backboard resting in dados on the inside of the frame. The styles (vertical parts) of the back frame would have been connected to the top and bottom parts by a mortise and tenon joint. No mention of any of this in the article and given the introductory level of the book, this isn't something you could assume the reader would know. Also, the detailed drawings leave no room for these tenons. So, if you had prepared stock to the cut list before looking hard at what had to be done, your boards would be too short.
All of this is what you'd expect if these were just drawings taken from a piece that wasn't able to be disassembled. However, if the author had subsequently built the chair all of this would have been rectified.
All that said…The chairs are deceptively complex. While most of the pieces are flat boards, there are a lot of them, and the joinery is fussy. Boring accurate holes will result in a solid chair where the pegs are almost superfluous. While it's possible to make these where the only parts that are glued in are the pins, that makes nearly impossible for someone with only 4 arms to assemble the chair.
To reduce the number of parts, what I did (and seems to be a common shortcut), was to glue the seat back into its frame components turning 5 boards into 1. I also glued the front of the seat frame to the seat board. The back of the seat board slots into the bottom of the backboard frame and the sides are slid onto the pins at assembly time, owing to the fact that they capture the lower back assembly pins.
Assembly proceeds by setting the seat board assembly on its side and sliding it into the backboard assembly, applying the seat board side frame board and the arm for this side and pinning the arm in place. Then flip the whole thing over and pin on the other board and arm. Now, affix the legs by flipping the seat assembly upside down. Care should be taken in order for the legs otherwise they end in spikes rather than a bevel. Note that having 3 of these is a special kind of hell, being handmade they are not part interchangeable. Consequently, I usually only take them to Pennsic where the length of time they are in use is worth the assembly pain.
Something else that's not obvious when constructing these is the orientation of the pins. There are 3 sets of fixed pins, two in the back assembly, one on the front of the seat assembly. These need to be glued and/or pinned in. Care should be taken to orient the peg slots in these pins so that they will be properly oriented when the chair is assembled otherwise the pegs might drop out in use. These should also be clocked for the best effect (all have the same orientation).
They do pack down, but the seat & back assemblies are awkward large with the pins sticking out all over, the rest is nice and compact.
Common Terms: : Glastonbury Chair (In England), Petrarca Chair (continental Europe), sedia pieghevole (Latin), Faitlestuhl (German)
Gallery of Period Illustrations and Extant Examples


Gallery of Modern Reproductions
Alamy Stock Photo site. Shot in England, 2007. Looks a lot like a copy of the Glastonbury chair in pine and somewhat thinner stock. Src
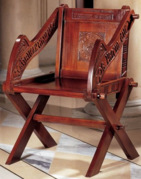
Commercial reproduction from the Netherlands. €189. Src
Commercial reproduction from Kokosh's Manufacture. Glastonbury Chair F3. 180€ + Shipping Src
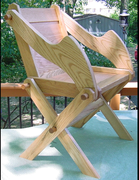
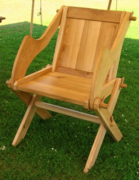
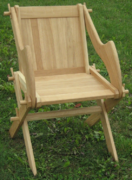
Reproduction by the author

Unknown. Probably a 19th Century reproduction. Src
Commercial reproduction marketed on Wayfair.com as a 16th Century Armchair. $741. [Commercial reproduction marketed on Wayfair.com as a 16th Century Armchair. $741 Src

A reproduction chair, also in the Bishop's Palace, Wells Src


Folding Chairs Home
| Type 1 | Type 1A | Type 1B | Type 2 | Type 2A | Type 2B | Type 2C | Type 2D | Type 2E | Type 3 |